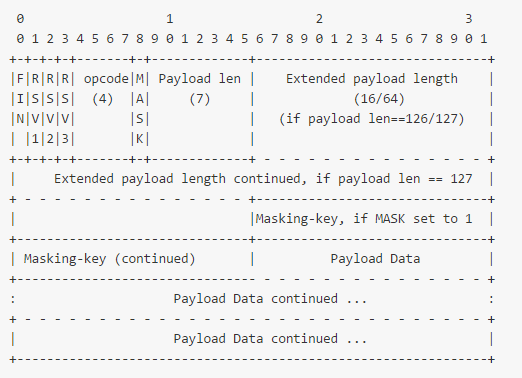
协议内容
http://chenjianlong.gitbooks.io/rfc-6455-websocket-protocol-in-chinese/content/index.html
文档最重要,一开始,直接过一遍文档再说。
实现协议就以下几点:
- 握手
- 获取数据内容
- 发送消息
关于握手
- 服务端获取到Sec-WebSocket-Key
- 将这个key与字符串258EAFA5-E914-47DA-95CA-C5AB0DC85B11相连
- 对新的字符串通过sha1散列算法进行计算
- base64编码
- 写入"Sec-WebSocket-Accept"响应给客户端
- 完成握手
// 获取响应string
exports.getHandshake = function(header)
{
    var sha = crypto.createHash('sha1');
    var salt = "258EAFA5-E914-47DA-95CA-C5AB0DC85B11"; // 这个salt是固定的
    sha.update(header['Sec-WebSocket-Key'] + salt, 'ascii');

    var response = 'HTTP/1.1 101 Web Socket Protocol Handshake\r\n';
    response += 'Upgrade: ' + header['Upgrade'] + '\r\n';
    response += 'Connection: ' + header['Connection'] + '\r\n';
    response += 'Sec-WebSocket-Accept: ' + sha.digest('base64') + '\r\n';
    response += 'WebSocket-Origin: ' + header['Origin'] + '\r\n';
    response += 'WebSocket-Location: ' + header['Host'] + '\r\n';
    response += '\r\n';

    return response;
};
关于获取数据内容

// 获取数据帧格式数组
exports.getProtocol = function(data)
{
    var protocol = {
        start : 2, // mask key 的起始index,头2字节是fin,rsv,opcode,mask,payload len,后面的长度根据payload len来定
        msg : '' // 消息内容
    };

    // 第一个字节
    protocol.fin = this.getOneBit(data[0], 0x80); // 1位,分片,是否是最后一片
    protocol.rsv1 = this.getOneBit(data[0], 0x40); // 1位,通常为0
    protocol.rsv2 = this.getOneBit(data[0], 0x20); // 1位,通常为0
    protocol.rsv3 = this.getOneBit(data[0], 0x10); // 1位,通常为0
    protocol.opcode = data[0] & 0x0f; // 4位,0 代表一个继续帧 1 代表一个文本帧 2 代表一个二进制帧 3-7 保留用于未来的非控制帧 8 代表连接关闭 9 代表ping A 代表pong B-F 保留用于未来的控制帧
    // 第二个字节
    protocol.mask = this.getOneBit(data[1], 0x80); // 1位,是否经过掩码,从客户端发送到服务器的所有帧有这个位设置为1
    protocol.payload_len = data[1] & 0x7f; // 7位,如果是 0-125,这是负载长度;如果是 126,之后的两字节解释为一个16位的无符号整数是负载长度;如果是127,之后的8字节解释为一个64位的无符号整数是负载长度
    // 根据payload_len判断负载长度
    if(protocol.payload_len >= 0 && protocol.payload_len <= 125){
        protocol.len = protocol.payload_len; // 就是他自己
    }else if(protocol.payload_len == 126){
        protocol.start += 2;
        protocol.len = (data[2] << 8) + data[3]; // 后16位,2字节
    }else if(protocol.payload_len == 127){
        protocol.start += 8;
        protocol.len = data.readUInt32BE(6);  // 后64位,8字节,仅支持后面4字节
    }else{
        return false;
    }
    // 获取mask key
    if(protocol.mask){
        protocol.mask_key = data.slice(protocol.start, protocol.start + 4);
        protocol.start += 4; // 去除mask key 本身的4字节长度
    }

    return protocol;
};
// 获取数据内容
exports.getMessage = function(data, protocol)
{
    if(protocol.mask_key){ // 客户端的数据必须包含mask_key
        var bufLen = data.length - protocol.start; // 可能的数据长度
        if(bufLen > protocol.len){ // 考虑混合帧的情况,如果可能的数据长度已经超过了之前协议定义的剩余数据长度,表示这个帧里面包含继续帧的协议内容
            bufLen = protocol.len; // 将buffer长度定义为剩余数据长度
            protocol.data = data.slice(bufLen); // 更新data的内容,slice后的data为新的协议帧内容
            protocol.sliced = true; // 标明这是一个混合帧
        }else{
            protocol.sliced = false; // 标明这是一个混合帧
        }

        var buffer = new Buffer(bufLen);
        for (var i = protocol.start, j = 0, k = protocol.msg.length; i < data.length; i++, j++, k++) {
            //对每个字节进行异或运算
            buffer[j] = data[i] ^ protocol.mask_key[k % 4];
        }

        protocol.len = protocol.len - bufLen; // 考虑分配情况,需要减去上次计算的数据长度
        protocol.start = 0; // 后面分片的数据开始未知为0
        protocol.msg += buffer.toString(); // msg的拼接
    }
};
关于分片
分片已经实现,一个帧的结束需要通过data的长度来判断,因为可能同一个包内包含两个帧的数据内容;并且IE/Firefox与chrome客户端的分片规则有点不一样,chrome每次发送的data数据内容最多为128kb,而IE/Firefox没有这个限制。github上有我详细的分片代码
关于发送消息
fin位=1,opcode=1,数据内容以要发送的数据内容为准
// 组装消息内容
exports.getSend = function(text)
{
    var length = Buffer.byteLength(text);

    // 消息的起始位置2个固定字节 + 数据长度
    var index = 2 + (length > 65535 ? 8 : (length > 125 ? 2 : 0));

    // 整个数据帧的定义
    var buffer = new Buffer(index + length);

    // fin位=1,opcode=1:10000001
    buffer[0] = 0x81;

    //  因为是由服务端发至客户端,所以无需masked掩码
    if (length > 65535) {
        buffer[1] = 0x7f; // 127
        // 8个字节长度
        buffer.writeUInt32BE(length & 18446744069414584320, 2); // 高4字节, 2^64 - 1 - 2^32 - 1
        buffer.writeUInt32BE(length & 4294967295, 6); // 低4字节, 2^32 - 1
    } else if (length > 125) {
        buffer[1] = 0x7e; // 126

        // 长度超过125, 2个字节长度
        buffer.writeUInt16BE(length, 2);
    } else {
        buffer[1] = length;
    }

    buffer.write(text, index);
    return buffer;
};
客户端
客户端代码比较简单,现代浏览器已经可以直接调用,以下是最简单的demo:
if ("WebSocket" in window) {
    console.log("WebSocket is supported by your Browser!");
    var ws = new WebSocket("ws://127.0.0.1:4000/");
    ws.onopen = function () {
        console.log('open');
    };
    ws.onmessage = function (msg) {
        var receive = msg.data;
        console.log("Message is received..." + receive);
        display(receive, false);
    };
    ws.onclose = function () {
        console.log("Connection is closed...");
    };
} else {
    console.log("WebSocket NOT supported by your Browser!");
}

function send()
{
    console.log("Message is sent...");
    var str = document.getElementById('msg').value;
    console.log(str);
    ws.send(str);
    display(str, true);
}

function display(msg, send)
{
    var div = document.createElement('div');
    if(send)
        div.innerText = '[我](https://hisune.com):' + msg;
    else
        div.innerText = '别人:' + msg;
    document.getElementById('content').appendChild(div);
}
关键代码就上面几大块,看详细代码移步github: https://github.com/hisune/websocket
如果您觉得您在我这里学到了新姿势,博主支持转载,姿势本身就是用来相互学习的。同时,本站文章如未注明均为 hisune 原创 请尊重劳动成果 转载请注明 转自: 一个简单的websocket协议的客户端服务端nodejs实现 - hisune.com
3 Comments
ketting00#24 Reply
I've tried to test the code, but I'm not successfully get it implemented on my system. I'd be greatly appreciated if you could write full tutorial (I can't read Chinese).
hiThreaded Comment 24 #25 Reply
@ketting00 You can download code in https://github.com/hisune/websocket. then run the app.js in nodejs. then copy the client code to a html file and open it(you can open the file in multi tab to test how it work). it will be run. in Chrome, you must run the html in a apache service or nginx service instead open it directly.
ketting00Threaded Comment 25 #26 Reply
@hi
Thank you so much for sharing it. Work perfectly.